
How to build a Private Blog Network? I’ll share the exact steps with screenshots throughout this piece. In the next 10 minutes or so, you’d be logging in to your PBN blogs, guaranteed.
Even if you’ve never built a PBN before and have just heard of the term, this guide is just for you. I’ve made sure absolute first-timers and those with zero previous PBN skills can build their PBNs through this guide.
PBNs may not be loved by Google, however, they’re still one of the most effective link sources if you do this right.
Let’s get you your first PBN then?
Table of Contents
What are PBNs?
Anyone who’s reading this piece on how to build a Private Blog Network clearly is new to this. If you know what PBNs are, simply scroll down. If you don’t, let me explain in brief.
PBNs are sites that are owned by you, for the sole purpose of linking to your own money (primary) sites.
We all know the importance of link juices, don’t we? These PBNs are just sites that you control that link to you, pure and simple.
Now, these are different from normal sites as you need to be careful when building PBNs. Google doesn’t like PBNs much and hence you need to make sure Google and other search engines can’t detect that they’re owned by the same person/individual, or that they’re built purely for link juices.
Let’s get started then?
How to build a Private Blog Network?
PBNs are probably one of the most effective link-building strategies when done “right”. When done wrong, your money site is penalized and you may never recover.
This is why it’s immensely important to choose the right host for your PBN sites. Throughout this guide, I’ll share with you how to build a PBN using SeekaHost.app.
Why SeekaHost? Here’s why:
- It specializes in PBN hosting using multiple IP addresses hosting solution
- You get Unique IPs for each site.
- Server locations are multiple and randomized.
- Completely free 7-day trial.
- Extremely cheap, starting at $1.35/blog/month.
- It’s also a domain registrar, you get to manage it all under one roof.
Because SeekaHost is a web hosting company with extensive experience in PBN hosting, your PBN will not easily be detected by search engines for IP footprints. The unique IPs and server locations ensure each site looks completely different from the other.
Let’s build your PBN then?
Get PBN hosting from SeekaHost.app [100% free]
The title mentions “100% free” so let me clarify it right away.
SeekaHost.app offers a very generous 7-day completely free trial. You aren’t charged during this period. After the period is over, if you do not cancel your trial, you’re charged based on the plan you opt for.
So, here’s how to build a Private Blog Network on SeekaHost.app in just 3 steps.
Start by signing up at SeekaHost.app. I’m sure everyone in this article already knows how to do that. Just go to the SeekaHost.app page> click on “Sign in”> then on the “Signup” link> fill in the form > verify your e-mail and done.

Now navigate to the “Hosting Plans” tab on the SeekaHost dashboard and choose “PBN Hosting” from the options.
You will now see multiple PBN hosting plans to choose from. Pick the one depending on the number of blogs you wish to create. Click on the “7-day free trial” link under the plan you need.

The next page will ask you for your personal information. Fill these in.

Finally, enter your payment information. Make sure that the displayed amount is $0.00 as you’re opting for the 7-day free trial now.

You can use both PayPal and a credit card to make your payment. You’ll only be charged after the trial is over.
Make this payment and you’re all set!
Get PBN domains from SeekaHost.app
You obviously now need domains, don’t you?
Registering your PBN domains on SeekaHost.app is as easy as getting the hosting.
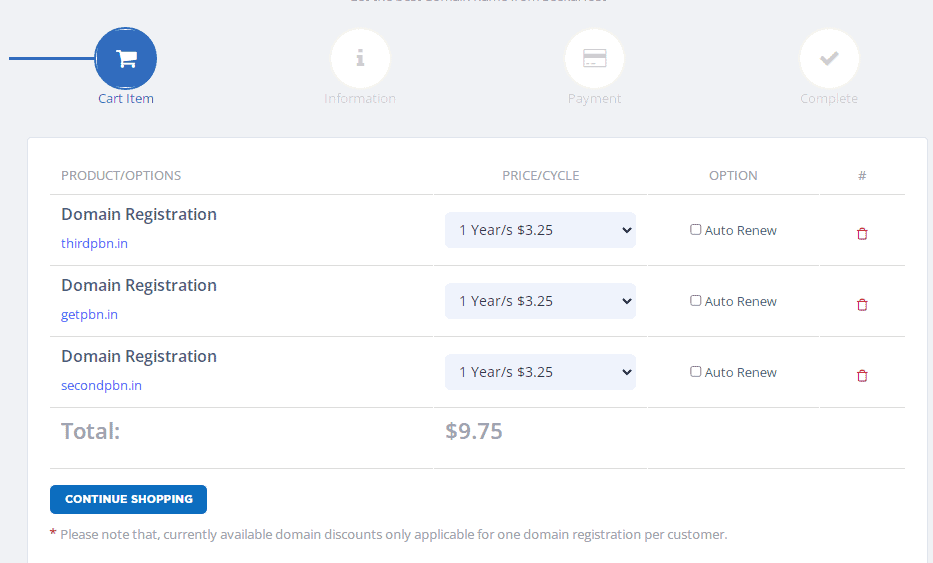
Just go to the “Domain Names” option, and then click on “Register domain” on SeekaHost.

Search for the domain you need. If it’s available, click on the “Add to Cart” button.

Note: SeekaHost supports the most popular TLDs.
A popup appears from the right. Click on the “continue shopping” button.

This is because you still need more domains for your PBN, don’t you? The “N” in PBN says “Network”, meaning more than one, right?
Repeat the process till you have all the domains you need and finally click “Checkout” on the slider from the right.
This will take you to the overview page. Click on the “Continue shopping” button.
Then you’ll be on the personal details page. Just like your hosting details, fill these in and go to the next page.

You’ll now be on the payment page. Just make your payment.
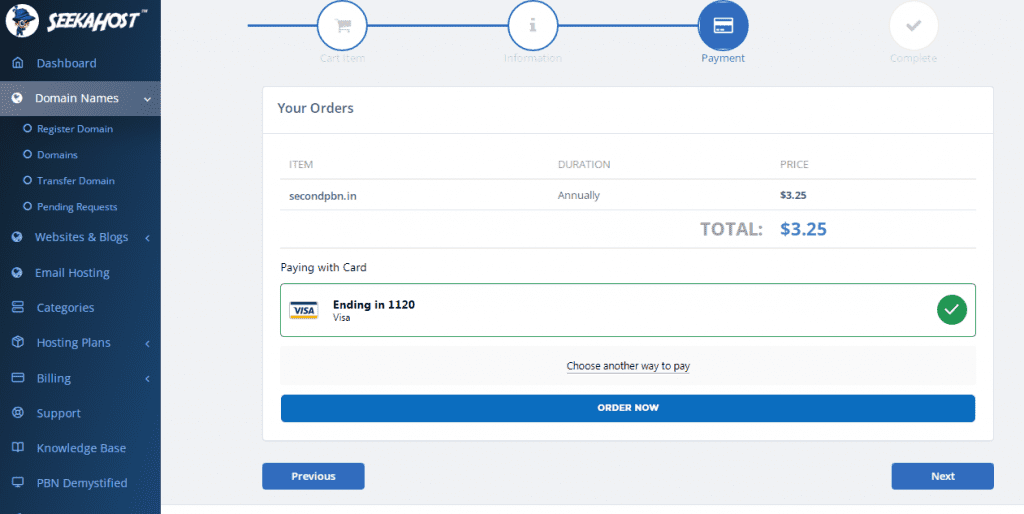
Tip: Because you just bought your PBN hosting, you do not need to enter a new payment method. You can just choose the last payment method to buy your domains. Obviously, new payment modes are accepted if you do not wish to use the previous payment mode.
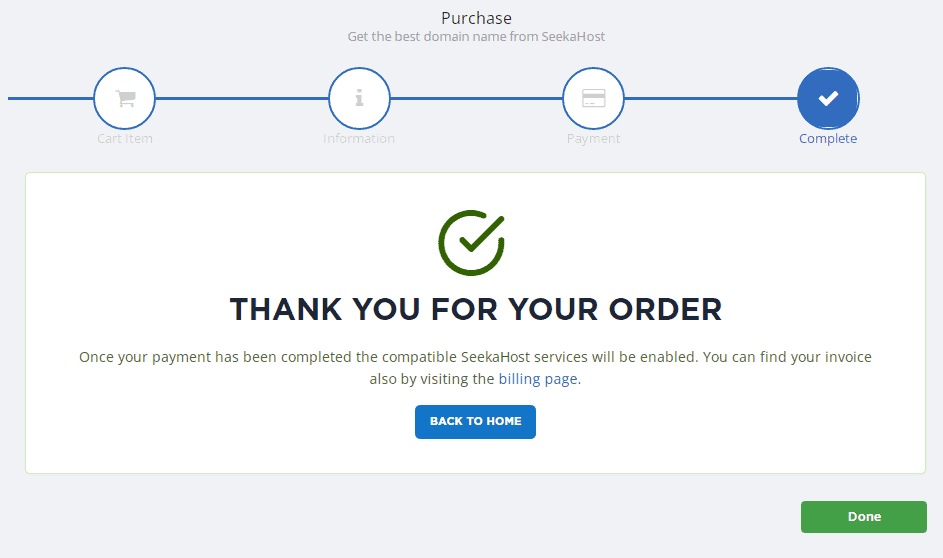
Done. A “Thank You” page greets you.
Install WordPress
Now that you’ve got your domain and server setup, let’s install WordPress. SeekaHost offers 1-click WordPress installers.
Just go to WordPress & Blogs > Private Blog (PBN). On this page, click on the “Create a new blog” option.

The next page is straightforward. Just enter the domain that you purchased for your PBN, set a blog title, and click “Add Blog”.
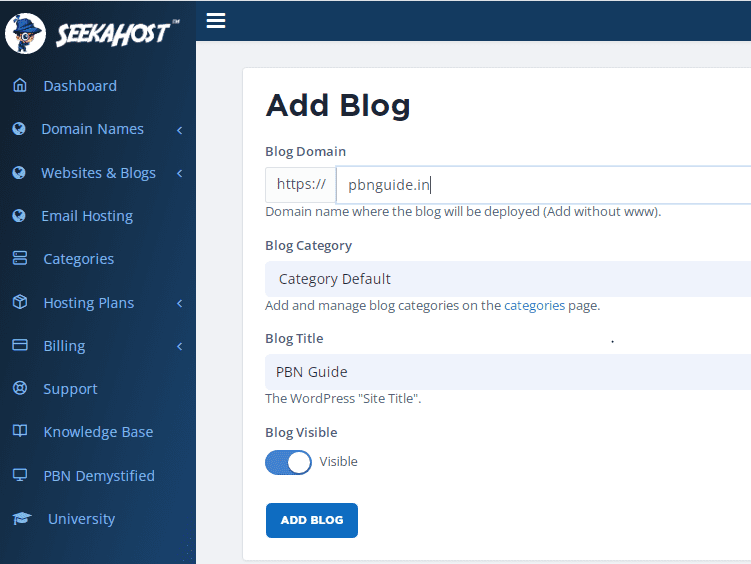
Repeat the exact steps for all the domains you’ve purchased.
Now, let’s get the nameservers for your blog. We’ll need to update these on our domain so the domain and the server are linked, right?
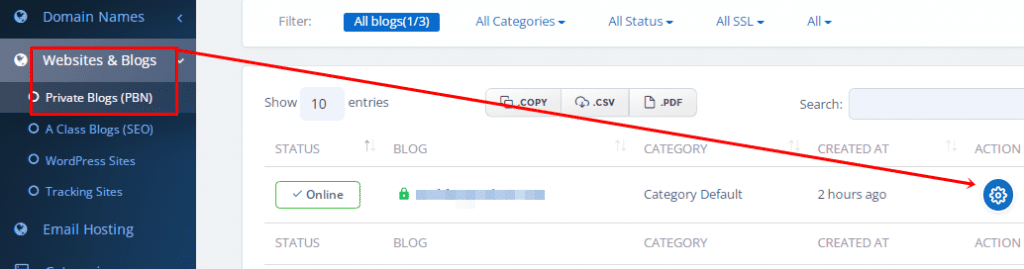
After the previous step, you should be on the PBN Blog List page. Just choose your domain, and click on the settings icon.

The next page will show you your nameservers and IP addresses. Copy the nameservers and the IP addresses. We’ll be needing these in the next steps.

If you’ve copied the data successfully, let’s move on to the next step.
Changing domain nameservers
Now you’ve got a domain and a hosting. I’m sure you’re aware of what the next steps include.
If you’re new, just know that you need to configure your domains’ nameservers. The steps are slightly different from pasting a normal nameserver so be thorough this section.
To do that, go to your SeekaHost domain manager. It’s located under “Domain Names” -> “Domains”. On this page, you click on the settings icon to go to your domain manager.

Now, unlock your domain. Just click on the “Domain Lock” slider.

Click on the “Nameserver” tab (on the same page). Scroll down to the “Private Nameservers” section. Paste the “ns1” (the rest is pre-filled depending on your domain name) and the IP address here > click “Create”.

We now need to paste the second name server. Repeat the same steps (paste “ns2” this time instead of “ns1”. Paste the IP as well, it remains the same.)
Next, on the same page, scroll up. You’ll see the “custom nameservers” fields. Paste both the nameservers in these fields and click “change nameservers”.

Done!
Install SSL certificates (free and one-click)
If you’re trying to learn how to create a PBN, I’m sure you’re already aware of the importance of SSL certificates.
These are free on SeekaHost.app.
Just go to your hosting panel (the page with your nameserver details) and click on “SSL” on the right.

On the next page, simply turn the SSL switch to “on”.

Your SSL should be activated in about 30 minutes.
Edit your first blog
Let’s recap.
By now the following should be checked off from your list:
- Purchased all the domains you need.
- Got at least some PBN package from SeekaHost.
- Set your private nameservers, as well as custom nameservers right?
- Enable SSL.
If all that’s done, your first PBN blog is already live!
Obviously, you’ll need to log in to make changes, wouldn’t you?
Go to your PBN Blog List page and then click on the actions/settings button.
On the next page, click on the “Site login” link.

Tip: You can also directly enter www.yourdomain.com/wp-login.php to get to your WordPress site’s login page.
As for the login credentials, you can find them in the e-mail ID you use for your SeekaHost account.
I wouldn’t try to teach you how to work with WordPress. Anyone creating a PBN definitely has a solid idea of WordPress and basic websites, don’t you?
Closing words- How to build a Private Blog Network
If you’re reading this, you’ve built your first PBN successfully.
The steps may seem a bit extensive on your first try. When you build your second PBN, I assure you it’ll take half the time it took now.
Just make sure your PBNs look and feel as legit as possible. It’s best to do some legit work on those, create social media profiles and make them as unique from the other blogs in your network as possible.
I hope you now know How to build a Private Blog Network. If you do, do share this piece on your social media. It wouldn’t cost you a penny!